Why Do I Want To Do This?
- Short Version: If you're running a larger-than-stock fuel pump, you've hot-wired your fuel pump, or both, your OEM fuel pressure regulator is not likely to be keeping your fuel pressure constant as you drive your car. A constant (differential) fuel pressure is an important factor in your ECU's ability to properly control your fuel injectors and deliver the correct amount of fuel to your engine. If the ECU delivers too much or too little fuel to your engine, it can cause drivability problems, poor gas mileage, and even engine damage. As much as possible, you want your fuel pressure to remain constant across the whole range of engine operating conditions.
-
Additional relevant information about my car's current
setup is as follows:
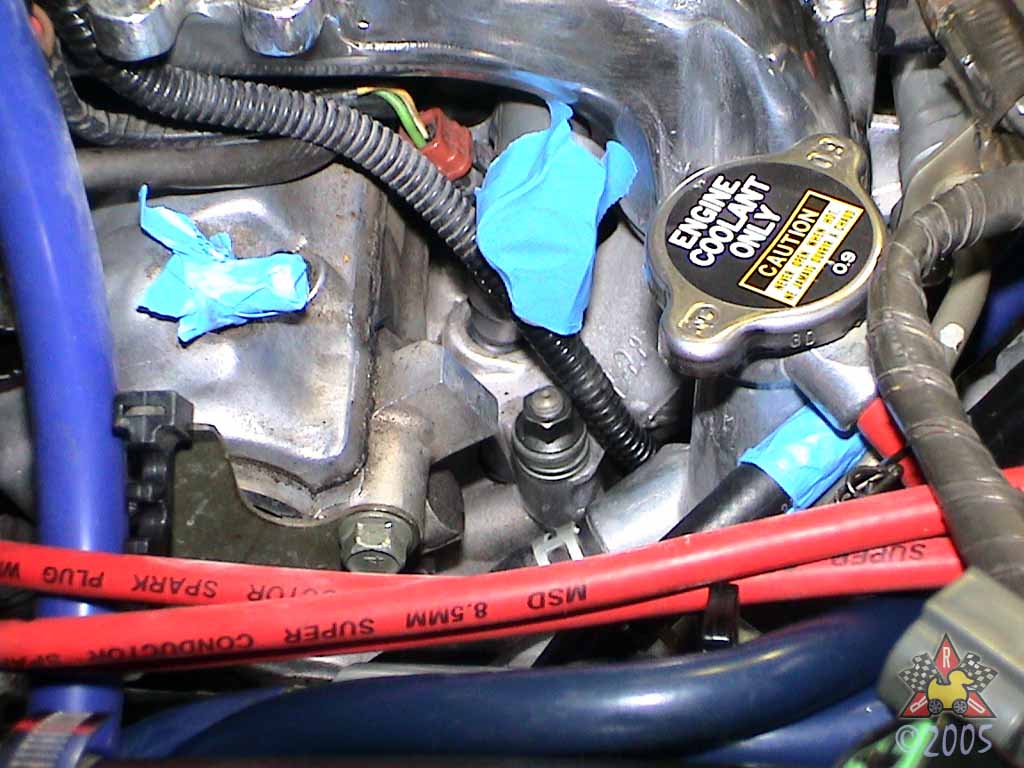
The powertrain is largely stock with the exception of an air filter, a downpipe, MSD ignition coils and wires, and a Supra fuel pump. The injectors are the factory injectors (80k miles) and have been cleaned and balanced by RC engineering (360cc +/- 1cc) within the last 500 miles. I have a Defi differential fuel pressure gauge, and all fuel pressure measurements are assumed to be differential with respect to manifold pressure. Knock information comes from the '94/'95 Hybrid Datalogger by Mirage Corp. For testing purposes, my boost controller was set to stock boost (~11psi) and my water/alcohol injection was turned off. Both oxygen sensors have less than 10k miles on them and are about a year old. The fuel filter has about 15k miles on it, and I always use Shell 92-octane gasoline. -
More Problem Details:
If the fuel pump is wired according to the RDR Fuel Pump Rewire Method, I see a slight (1-2psi) drop in fuel pressure as load increases toward the fuel pump voltage transition. I believe this is a result of the Supra pump's inability to flow enough fuel at this load with the reduced (8-9V) voltage. At the fuel pump voltage transition, fuel pressure spikes about 3-4psi over normal (total change 4-6psi). My suspicion, based on datalogs, is that this fluctuation in fuel pressure causes the ECU to be unable to set the fuel trim values to ensure proper fueling under light to moderate loads. - If the fuel pump is hotwired (~13V constant), then the OEM fuel pressure regulator is unable to lower the fuel pressure to normal (43-45psi) under low-load conditions. This results in a fuel pressure of around 51psi at idle, and this pressure decreases to 45psi as load increases. Once the fuel pressure decreases to 45psi, it stays there as long as fuel demand (IDC) remains constant or increases. Again, my suspicion, based on datalogs, is that this fluctuation in fuel pressure causes the ECU to be unable to set the fuel trim values to ensure proper fueling under light to moderate loads.
- Some may argue that this fluctuation in fuel pressure (~6psi) is not significant enough to be a problem, but based on my datalogs and findings after installing this AEM FPR, I contend that it is a problem. I cannot say for sure whether this is unique to my particular car or typical of all 3000GTs and Stealths, as I have not tested other cars. However, based on what I've read of others' experiences, I believe a significant number of other owners have experienced these problems. The main symptoms I noticed after installing my Supra fuel pump were throttle-transition knock (knock when you abruptly open the throttle plate) and low-RPM/part-throttle/high-load knock (such as when you're at 40% throttle in 5th gear on the highway and you build reasonable boost). I tried having the Supra pump installed with the RDR Rewire method and with it simply hotwired to the battery. The hotwire setup actually made things *worse* in my car, so I encourage all owners with hotwired Supra pumps and the OEM regulator to datalog somlow-RPM/part-throttle/high-loade "regular" driving and look for knock at throttle transitions or low-RPM/part-throttle/high-load conditions. Note that during all of the aforementioned experimentation, I rarely saw significant knock at sustained WOT (wide-open-throttle), even up to 15psi of boost.
- Supporting Data: Here are some graphs of some of the
many data logs showing the types of knock I experienced with
the Supra pump installed with the OEM fuel pressure regulator. The first
two are typical of what I saw with the fuel pump wired with the
RDR rewire method. The last 5 graphs are with the Supra pump
hotwired. Note that the knock is both more lasting and more
severe with the hotwire method.

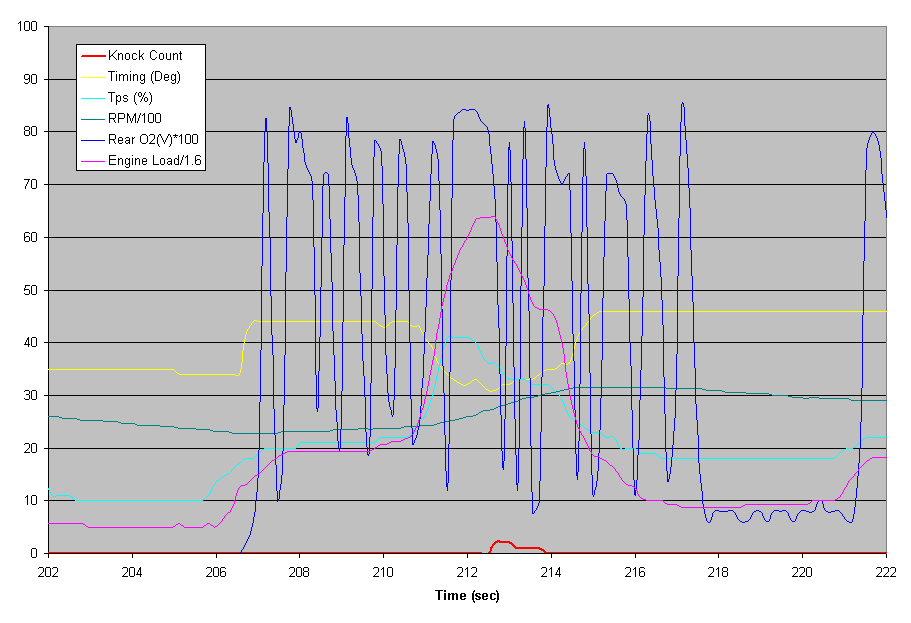
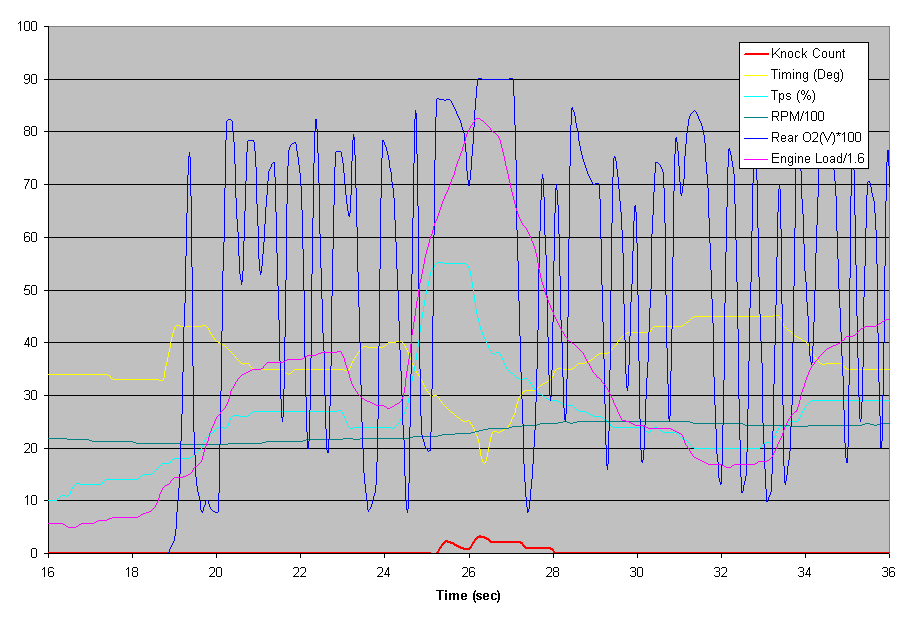
3rd Gear, Partial Throttle, Building Boost 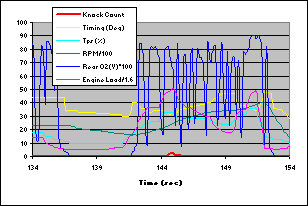
This data is with the Supra fuel pump wired with the RDR rewire method (switched voltage) and the OEM fuel pressure regulator.
From 141sec to 145sec, I slowly increased the throttle from closed to a little over 30%. As load increased above 40% (raw load of 64), some mild knock (2) appeared. As soon as the load dropped, the knock disappeared. During this time the ECU was in closed-loop mode with an A/F target of 14.7:1 (shown by the oscillating O2 voltage). Ignition timing was in the mid- to low-30s and RPM was between 2000 and 3000.
4th Gear, Partial Throttle, Building Boost 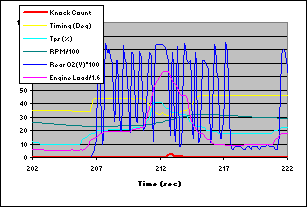
This data is with the Supra fuel pump wired with the RDR rewire method (switched voltage) and the OEM fuel pressure regulator.
From 206sec to 212sec, I slowly increased the throttle from closed to a little over 40%. As load increased above 60% (raw load of 96), some mild knock (2) appeared. The knock stayed around until the load dropped below 45%. During most of this time the ECU was in closed-loop mode with an A/F target of 14.7:1 (shown by the oscillating O2 voltage). For a brief time (abut 212sec to 213sec), it appears that the ECU went into open loop mode, but the O2 voltage was only 0.85 or so, which is relatively lean for open-loop. Ignition timing was in the mid- to low-30s and RPM was between 2500 and 3200.
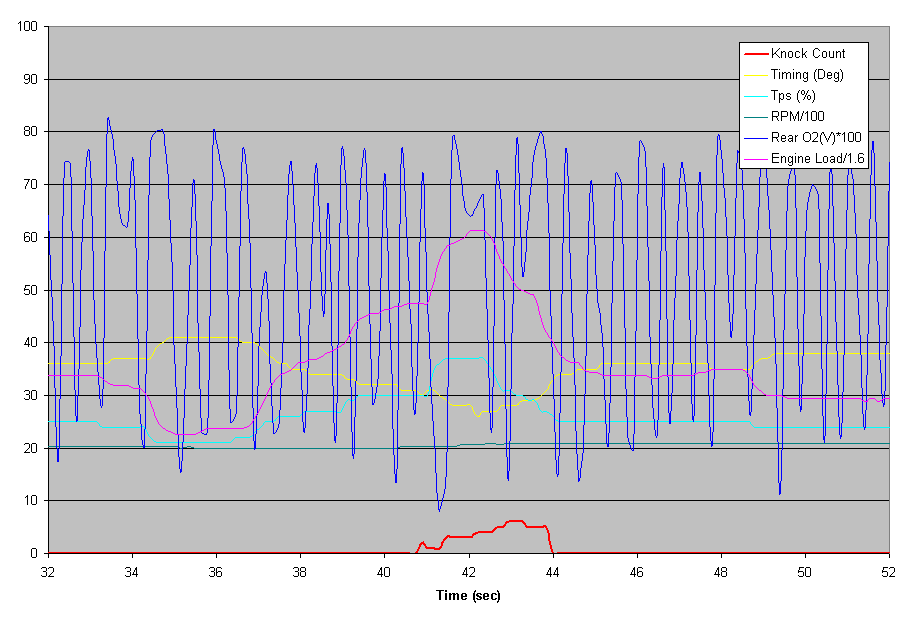
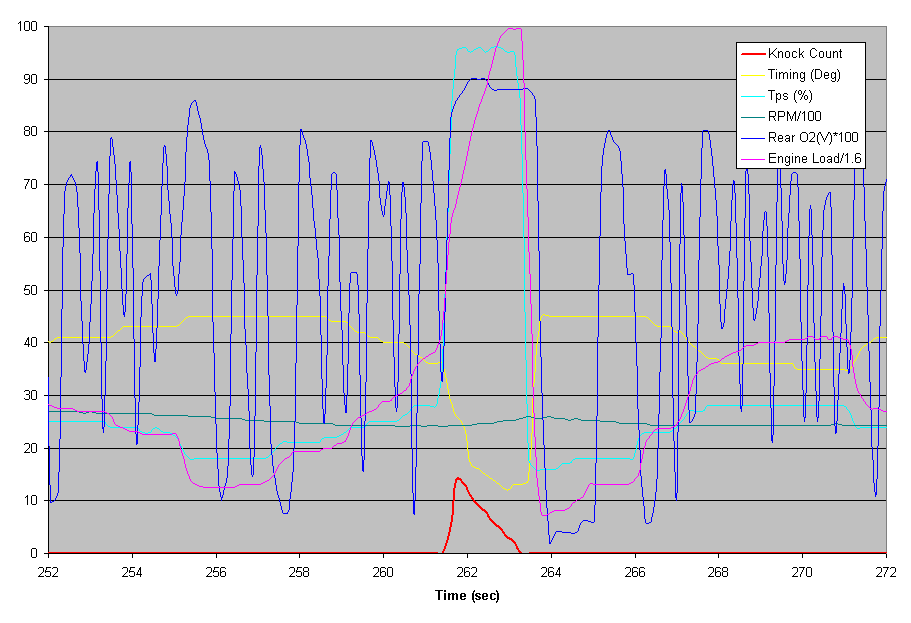
6th Gear, Partial Throttle, Building Boost 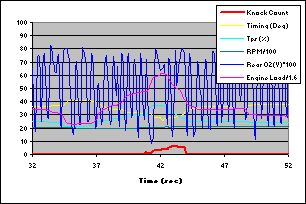
This data is with the Supra fuel pump hotwired (~13V constant) and the OEM fuel pressure regulator.
From 36sec to 42sec, I slowly increased the throttle from 20% to a little under 40%. As load increased to the high 40% range (raw load in the 70s), some mild knock (2) appeared. The knock got worse as load increased, and it did not go away until the throttle was reduced back to 25% and load dropped back to the 35% range. This knock lasted for 3 whole seconds and peaked at 6. It did not show any signs of going away until I backed off of the throttle. During most (perhaps all) of this time the ECU was in closed-loop mode with an A/F target of 14.7:1 (shown by the oscillating O2 voltage). Ignition timing was in the low-30s and dipped into the high 20s as load increased. RPM was between 2000 and 2100 RPM the whole time.
6th Gear, Partial Throttle, Building Boost 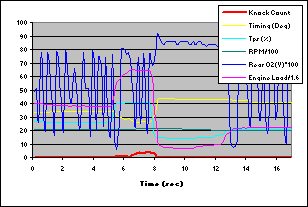
This data is with the Supra fuel pump hotwired (~13V constant) and the OEM fuel pressure regulator.
This one is pretty much the same as the above data, except that the knock peaked at 4, which is a little less severe.
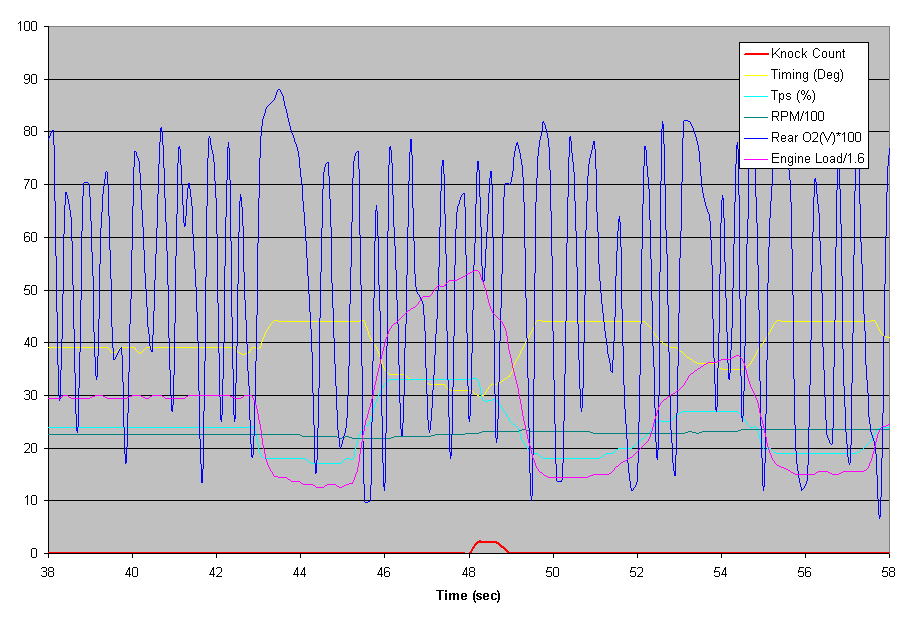
5th Gear, Partial Throttle, Building Boost 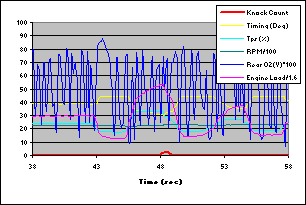
This data is with the Supra fuel pump hotwired (~13V constant) and the OEM fuel pressure regulator.
Same type of thing in 5th gear. Knock at will if I allow boost to build with partial throttle. The ECU is still in closed-loop mode and timing is in the low 30s.
5th Gear, Higher-Partial Throttle, Building Boost 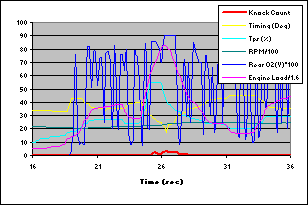
This data is with the Supra fuel pump hotwired (~13V constant) and the OEM fuel pressure regulator.
Here's what happens if I give it a little more throttle (55% or so) and allow the ECU to go into closed-loop mode. The O2 voltage makes it up to 0.90V, and we still get knock.
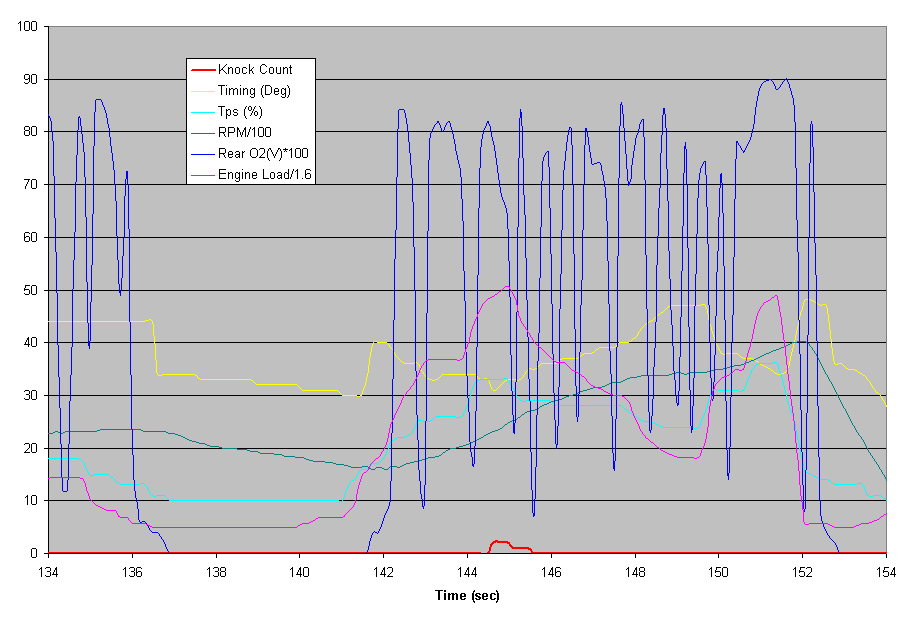
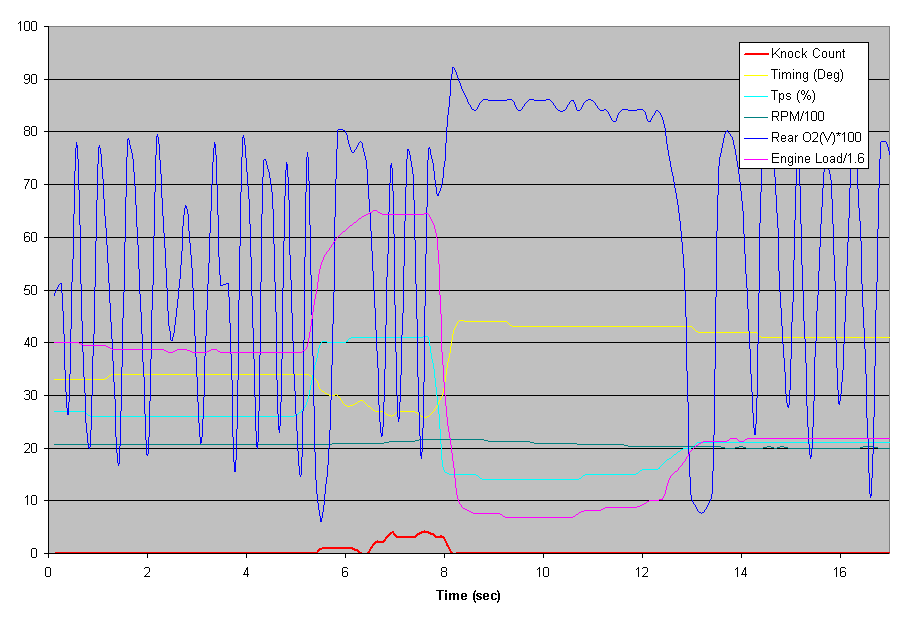
4th Gear, Quick Throttle Transition, Building Boost 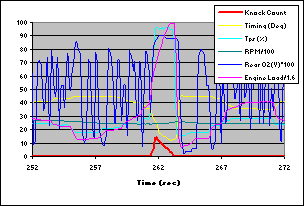
Here's what happens when you go from under 30% throttle to floored (100%) in a fraction of a second and hold the throttle floored. The knock count is at 5 even before the throttle is fully open, and knock is up to 14 once the throttle is fully open. The throttle is wide open for over a tenth of a second before the O2 voltage gets to 0.9V. The ECU pulls the timing all the way back to 12 degrees to combat the knock. The knock tapers off and finally goes back to 0 exactly when the throttle begins its decent. This situation did not occur often, but I don't want it occurring at all! -
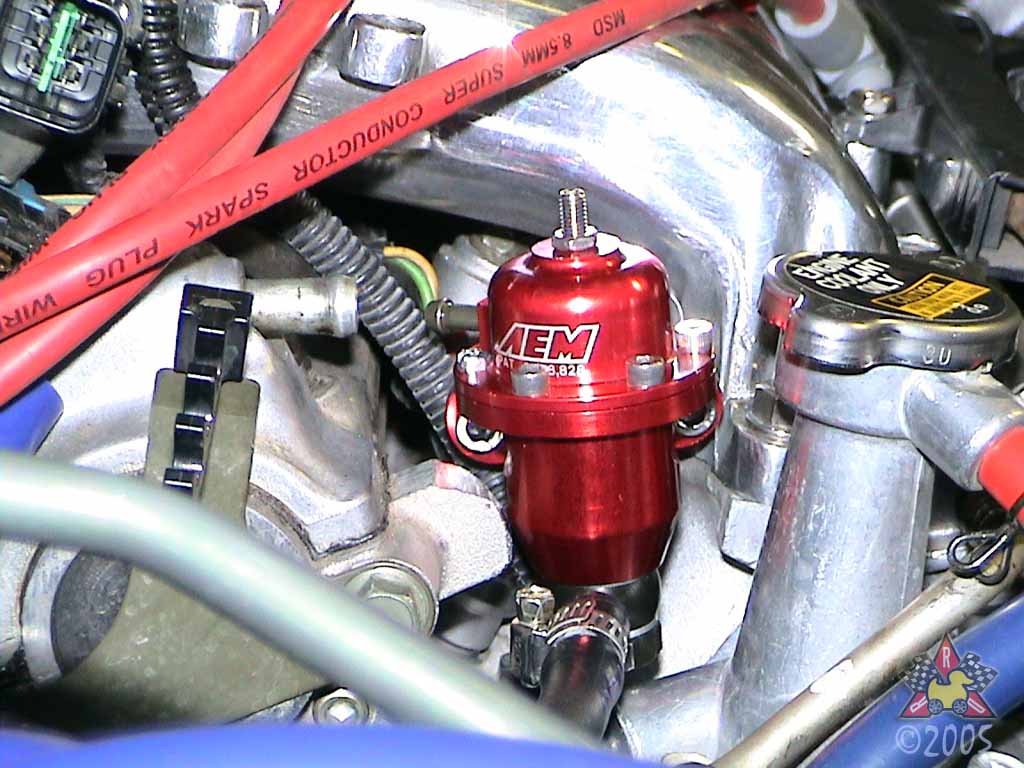
Other Benefits of the AEM FPR:
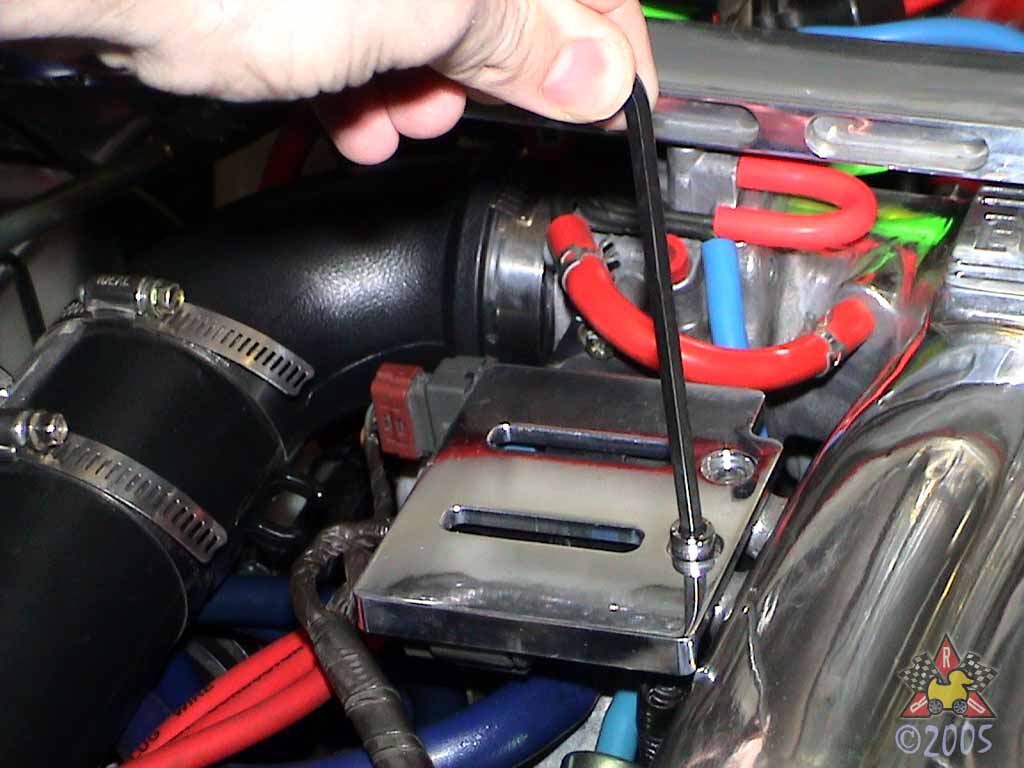
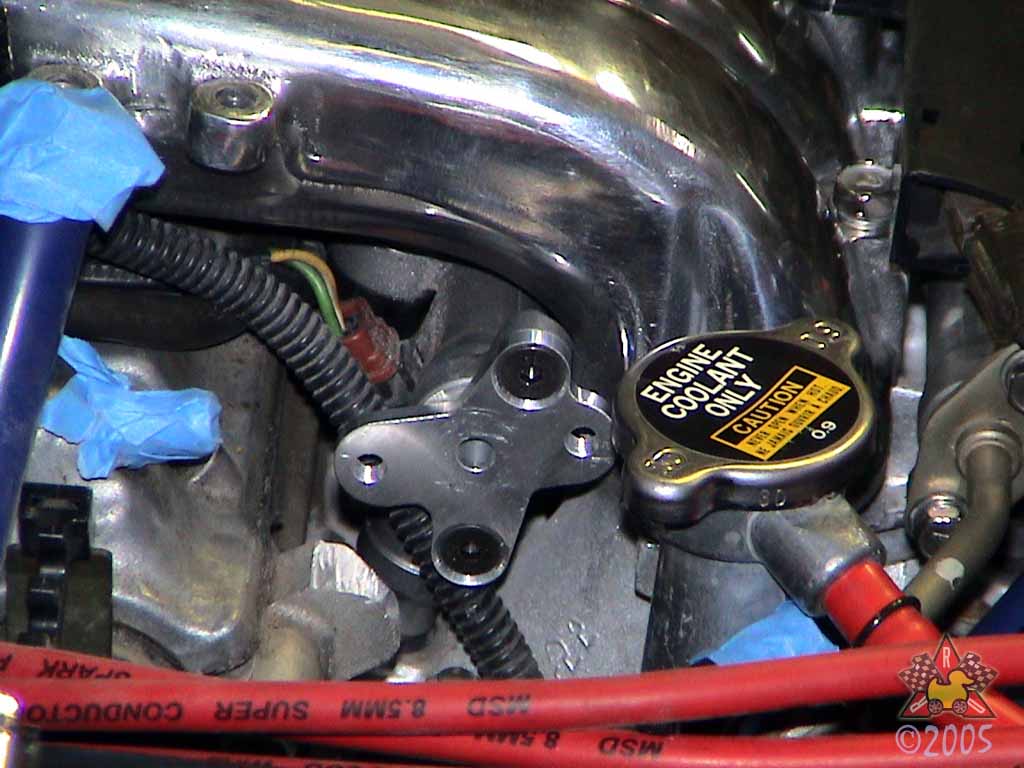
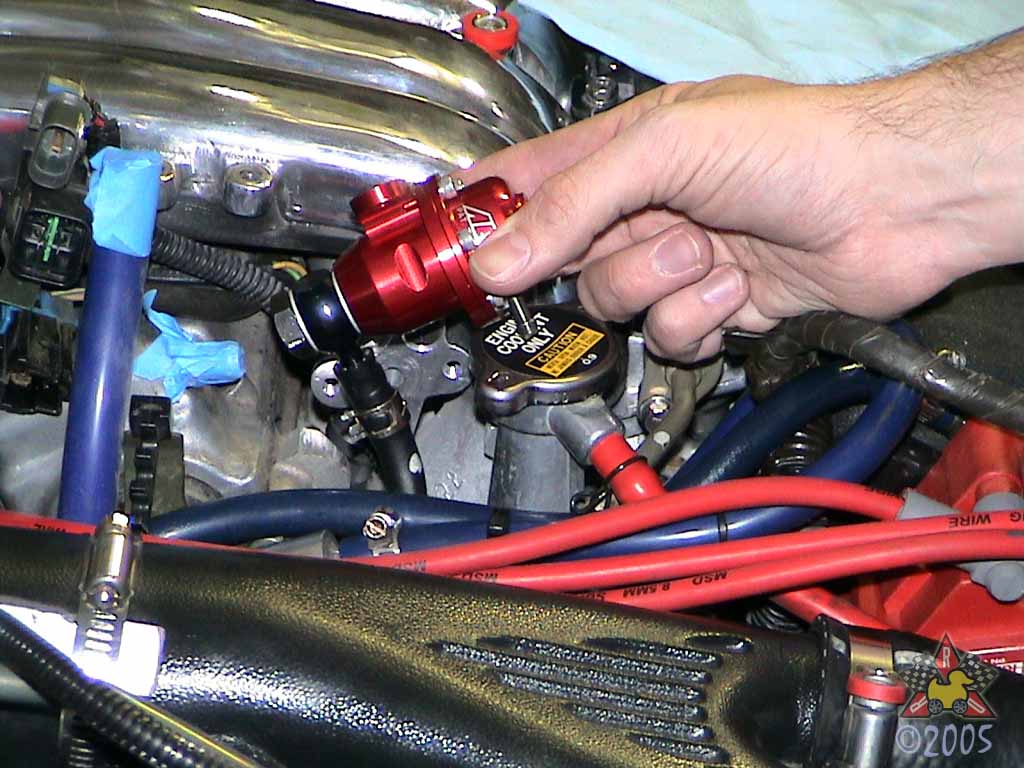
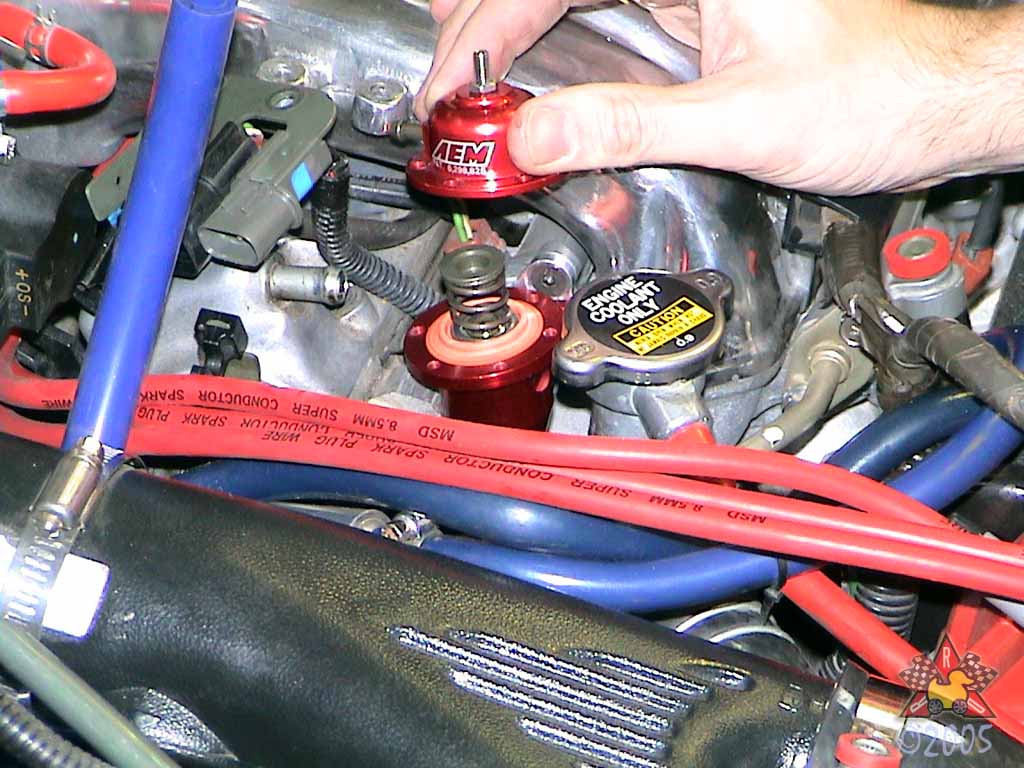
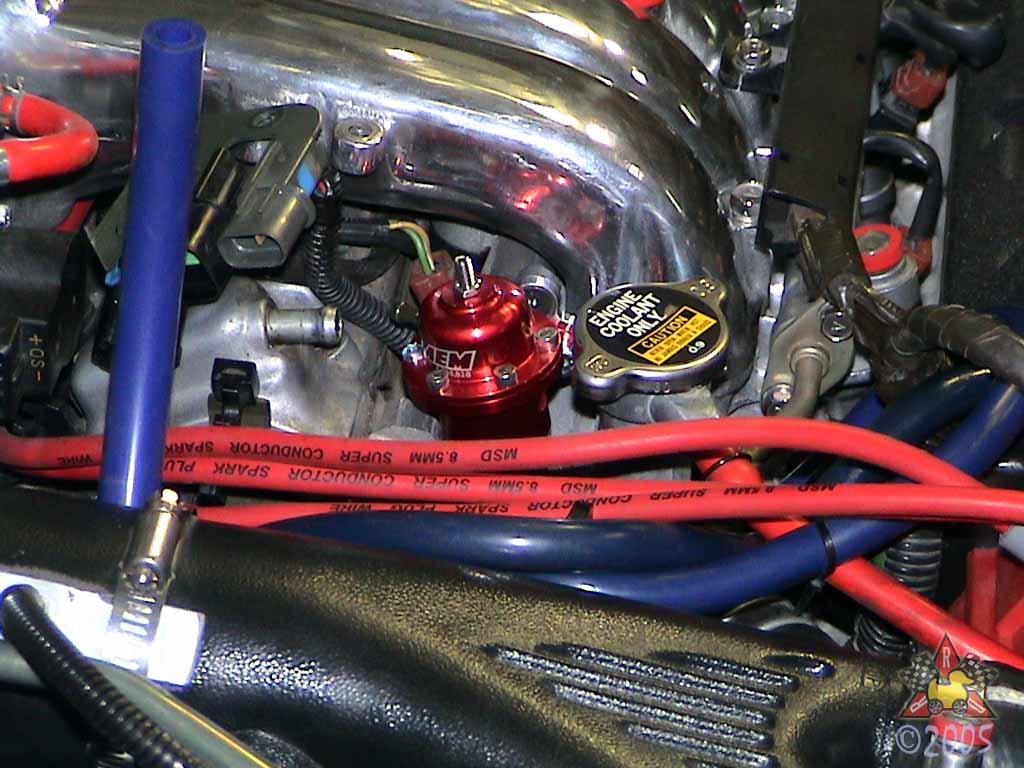
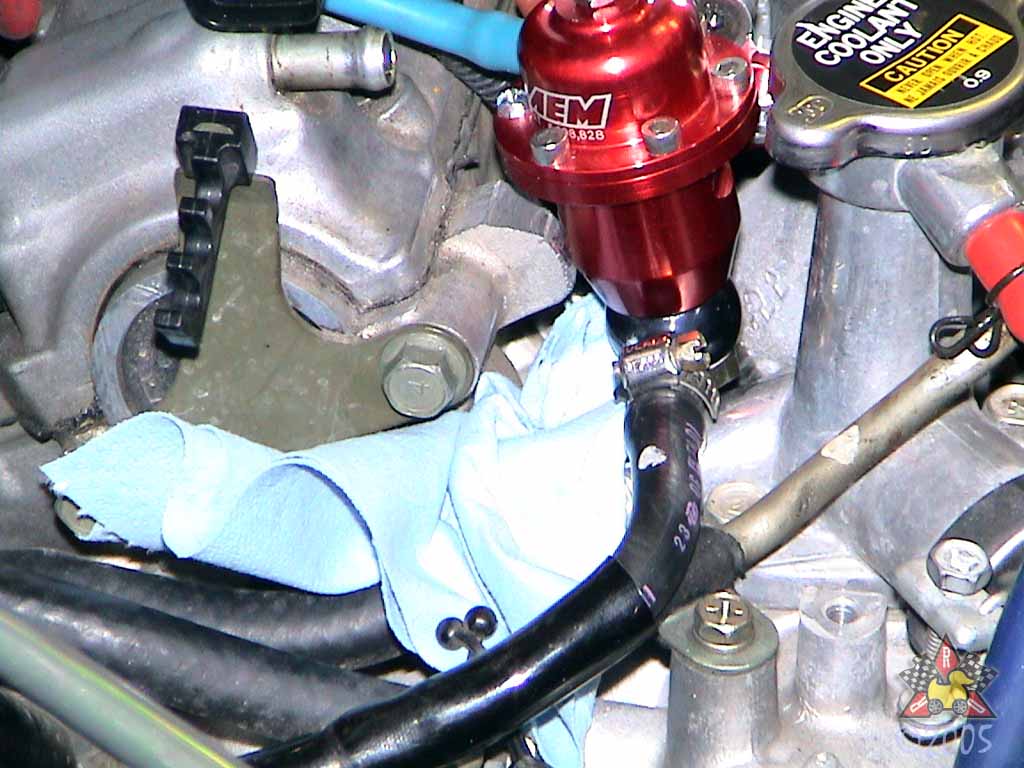
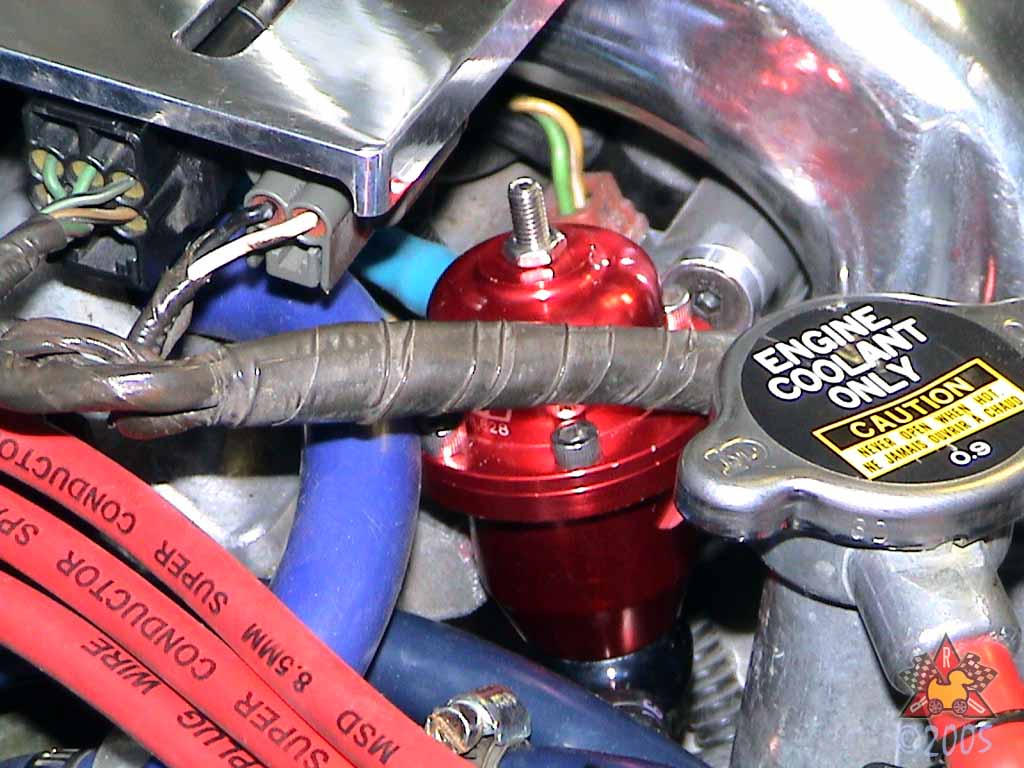
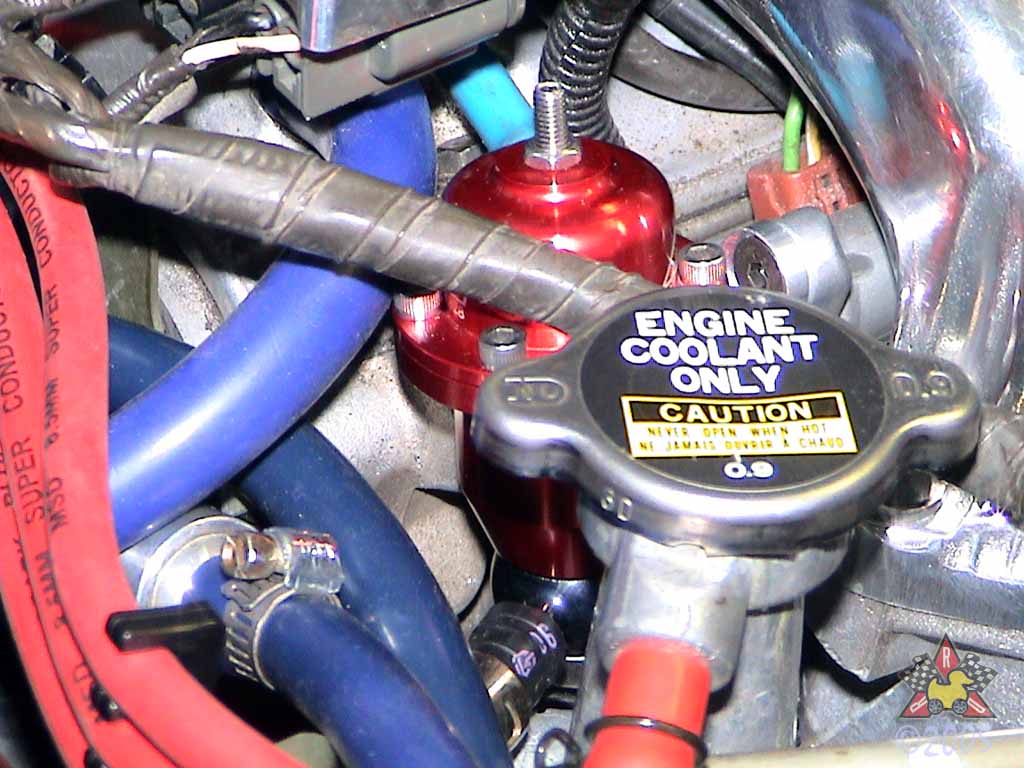
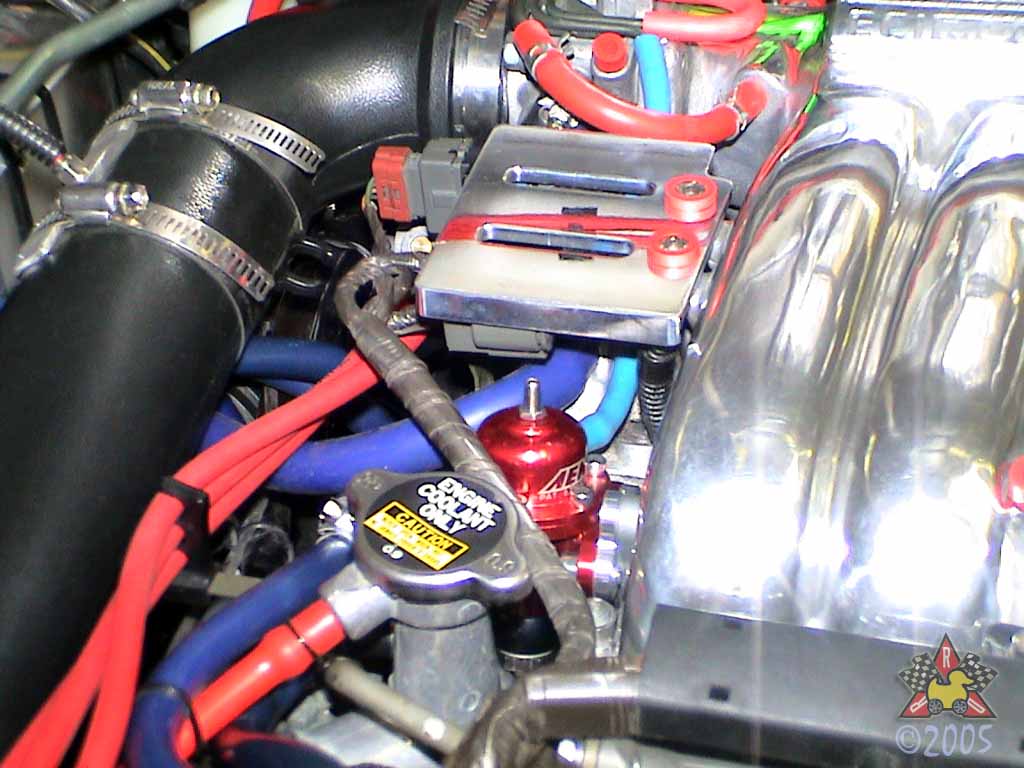
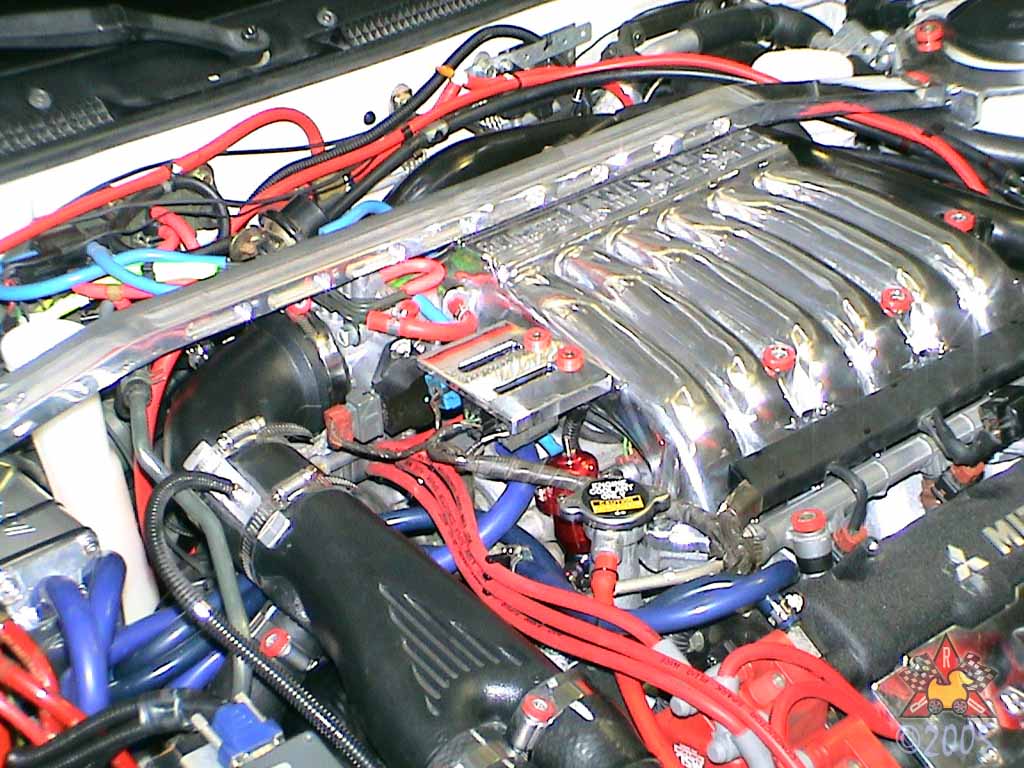
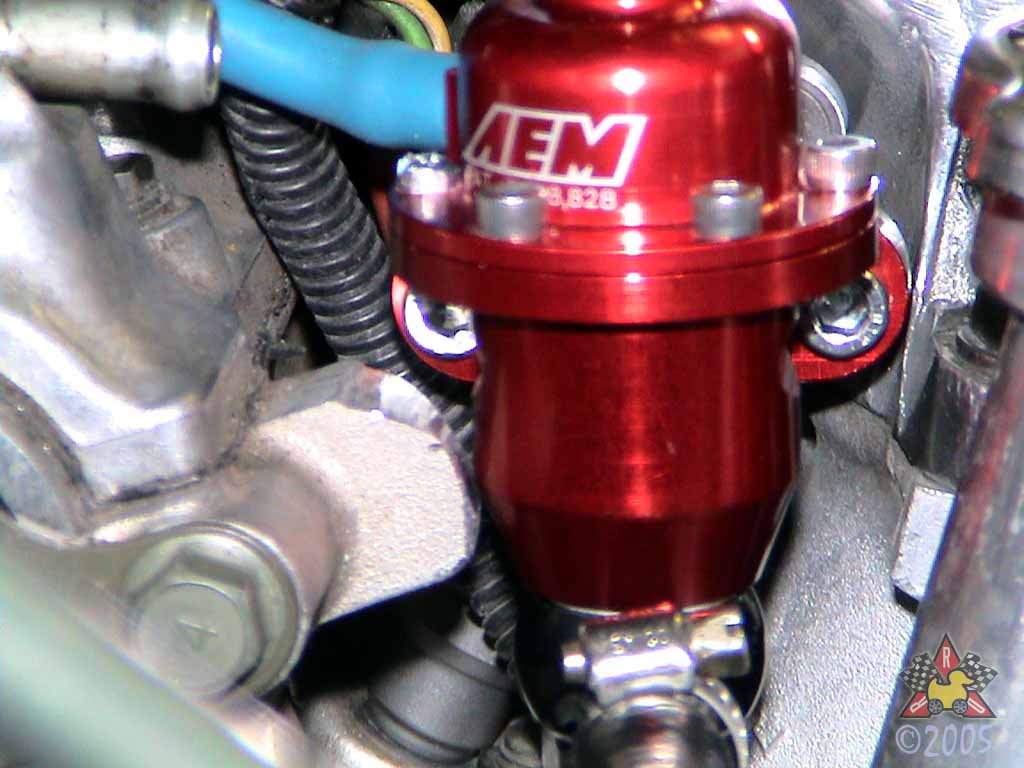
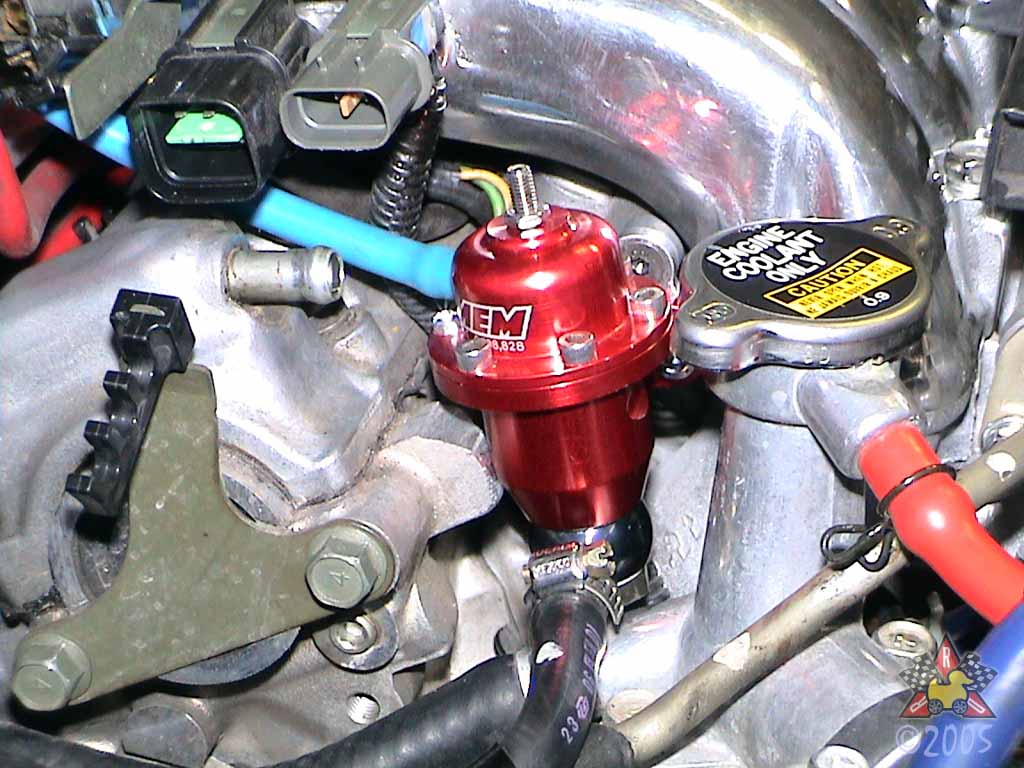
There are other options for those wishing to install an aftermarket fuel pressure regulator, but this is the only one I know of that does not require remote-mounting the FPR. If it weren't for the big AEM logo and the red color of the FPR, one might assume FPR and adapter plate came on the car from the factory. It really looks like it belongs there. Also, for those wishing to keep everything looking as close to stock as possible, AEM does offer the FPR in a silver color.
The most significant benefit of this particular FPR (to me) is that it does not require you to run fuel lines all over your engine bay to remote-mount the FPR. I see this as a huge safety and convenience benefit, in addition to its cheaper cost (vs another regulator and the associated fittings and lines required to connect it).
How Long Will It Take Me To Do This?
Note: This does not include time to perform any pre- or post-tasks.- First Timers: 180 minutes
- Seasoned Enthusiast: 90 minutes
Anything I Should Do Prior To Attempting This Procedure?
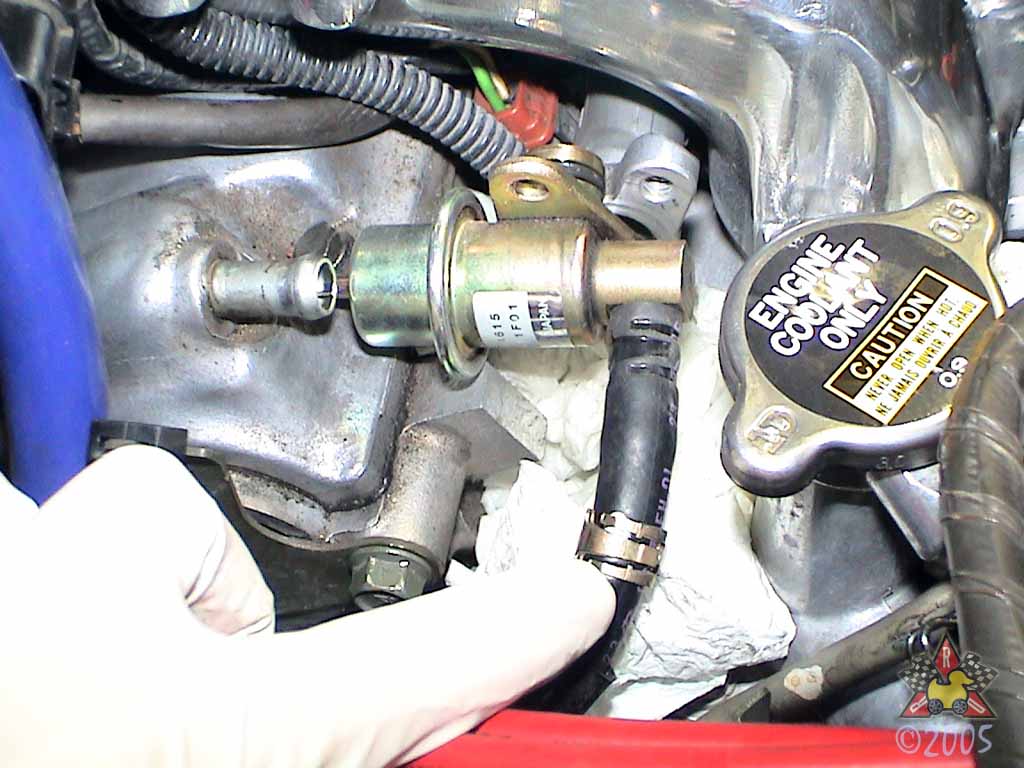
- Release the pressure from your fuel system. This is done the same way as when you change your fuel filter.
- Make sure you have a well-ventillated work area that has no sources of open flame or sparks. You will be working with gasoline, and the fumes are both highly flamable and hazardous to your health. Work outside if possible, or at least open your garage door all the way and get some fans blowing air through it.
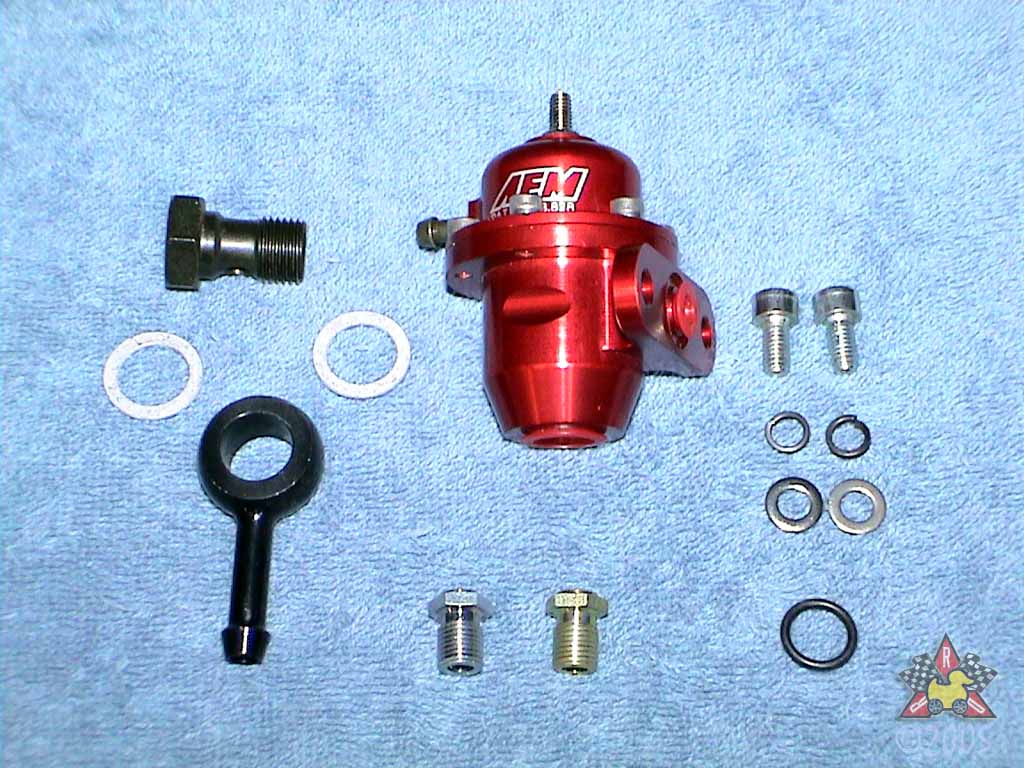
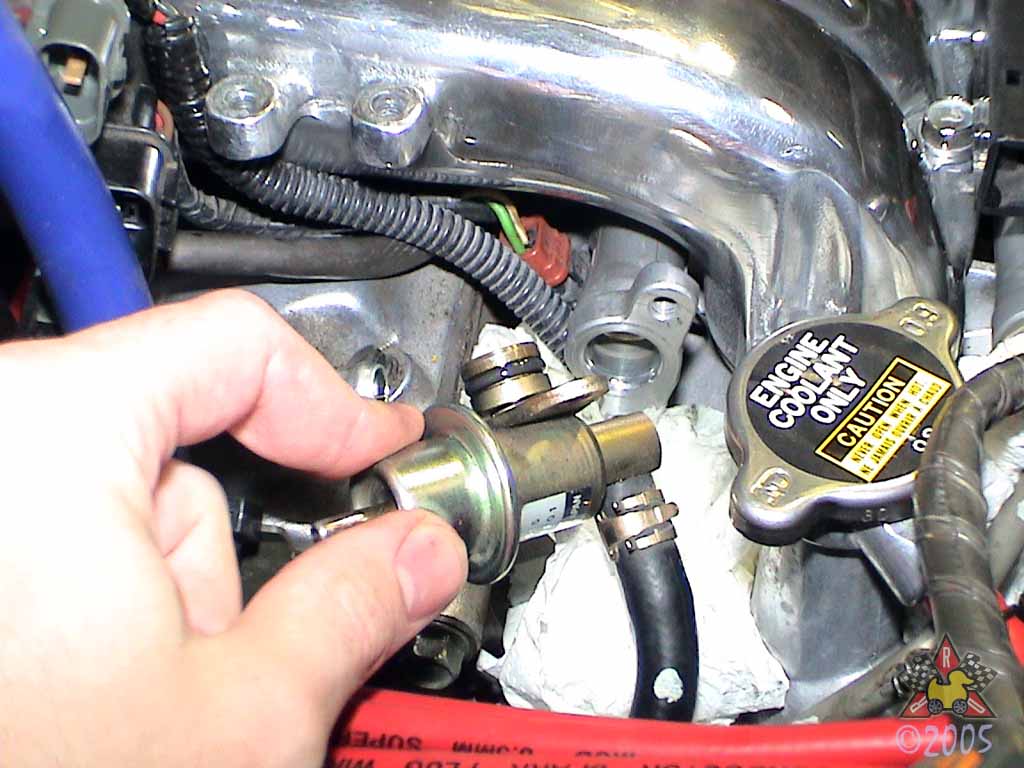
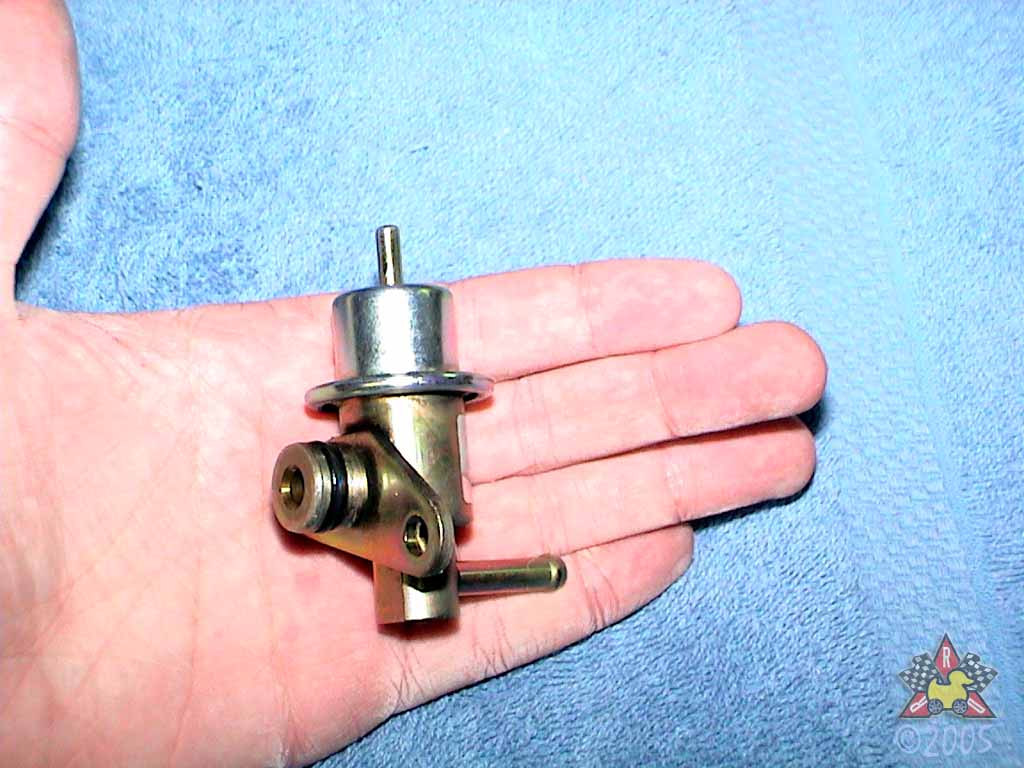
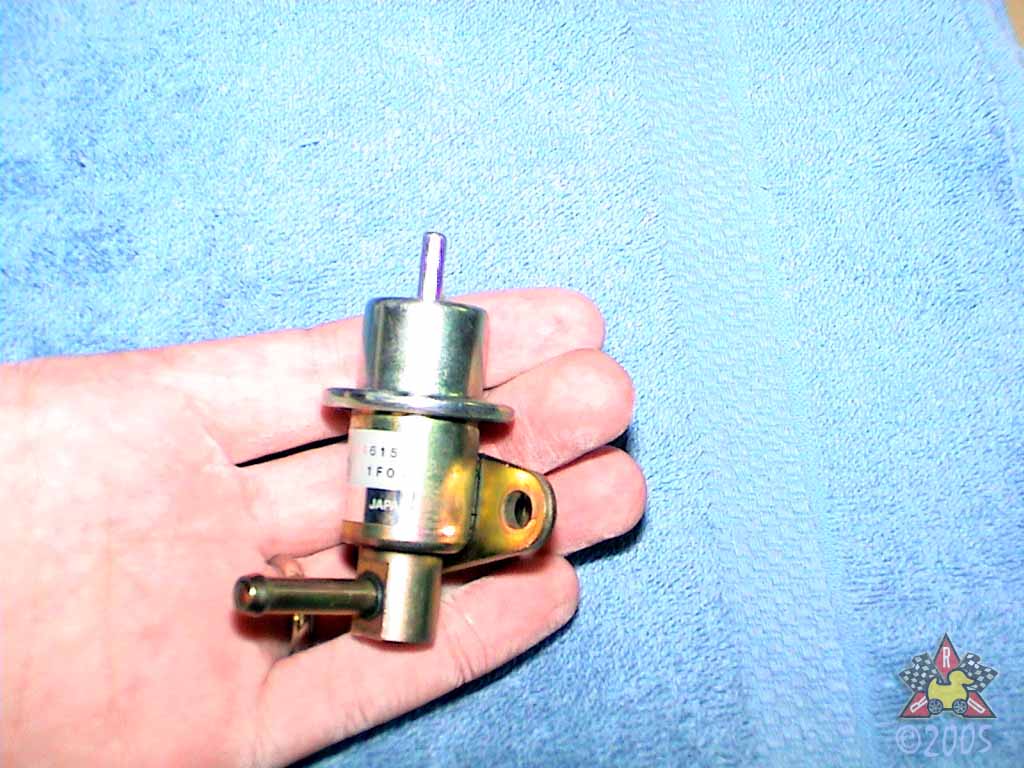
What Mitsubishi Parts Will I Need?
- None.
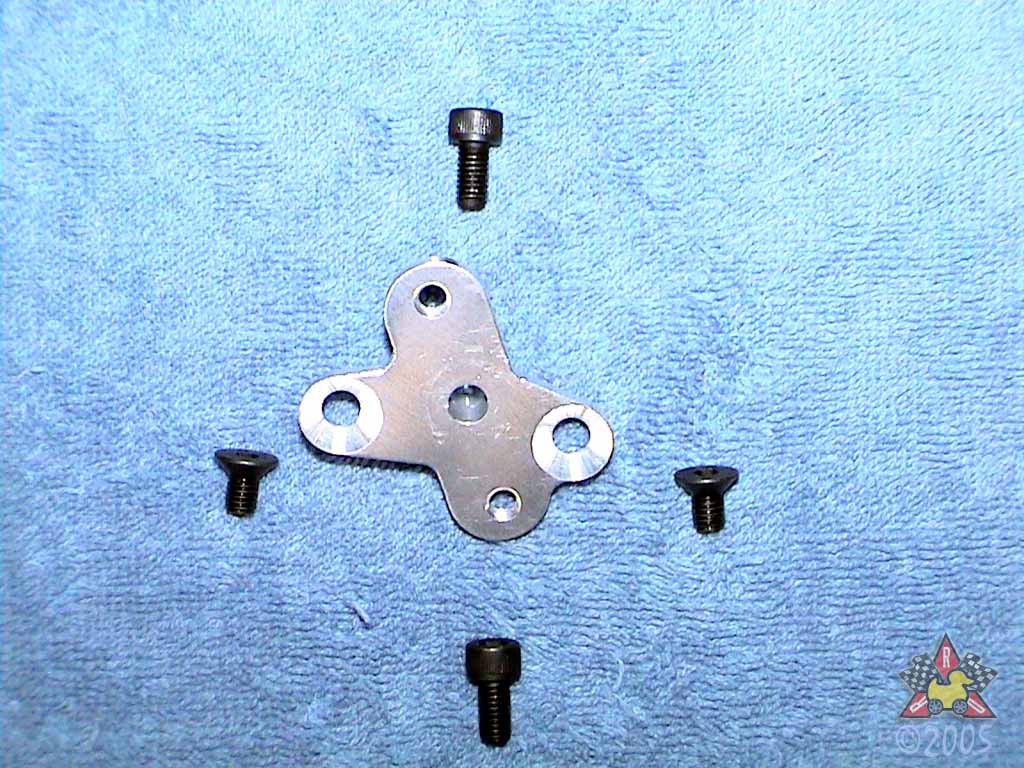
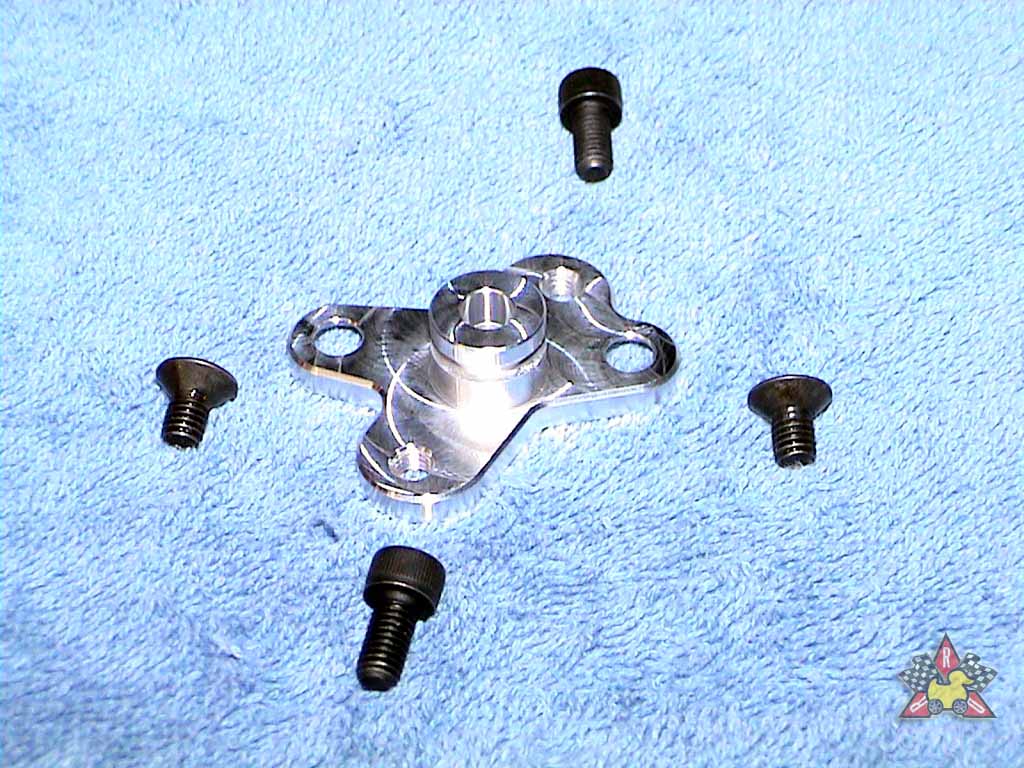
What Other Parts Will I Need?
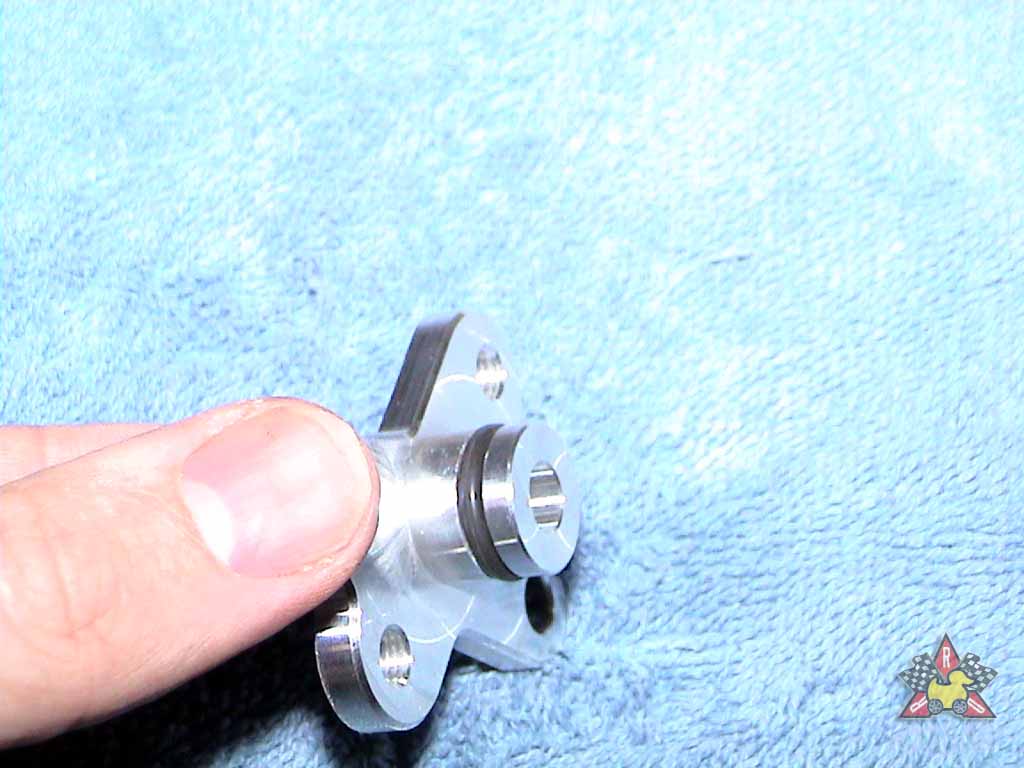
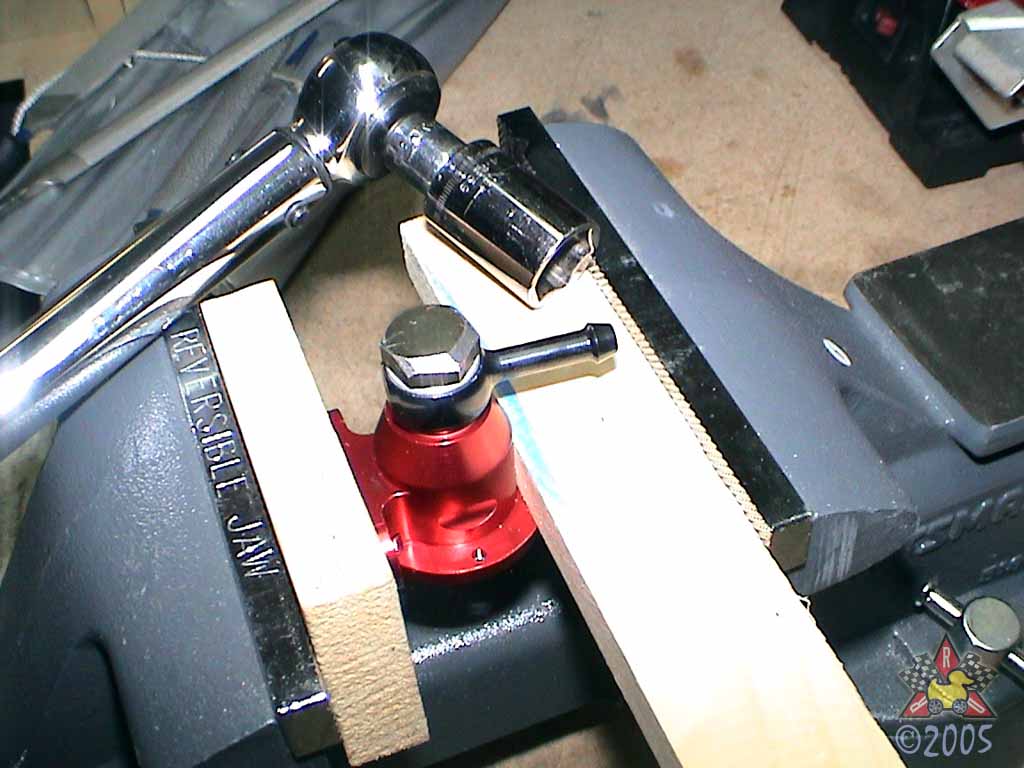
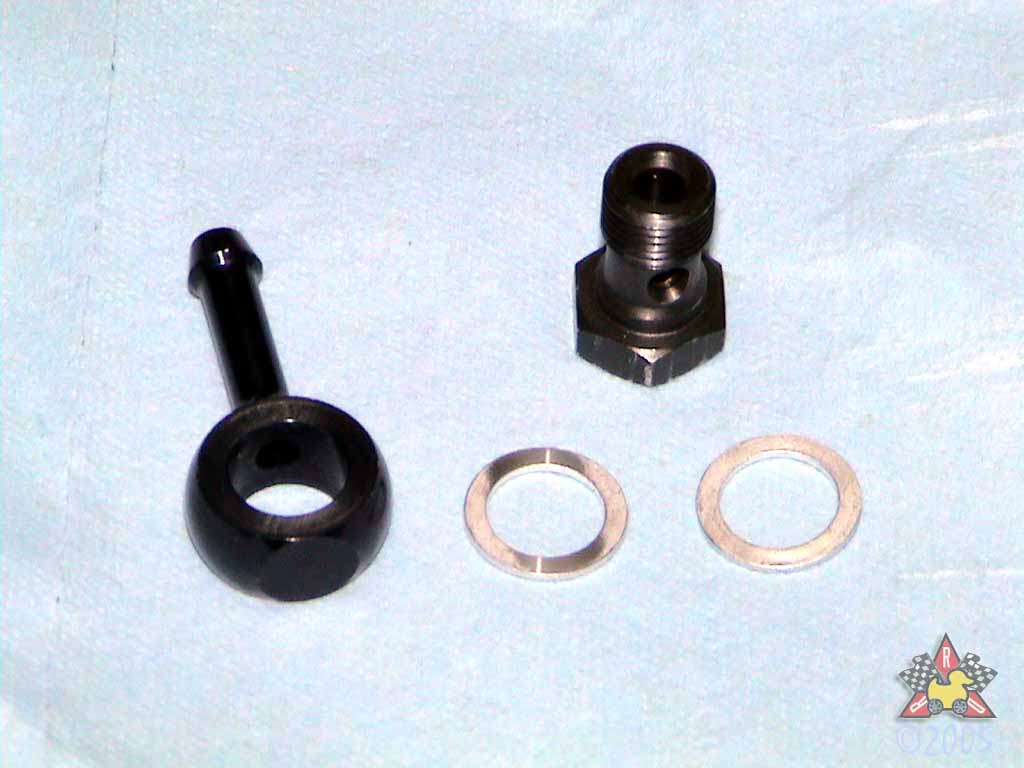
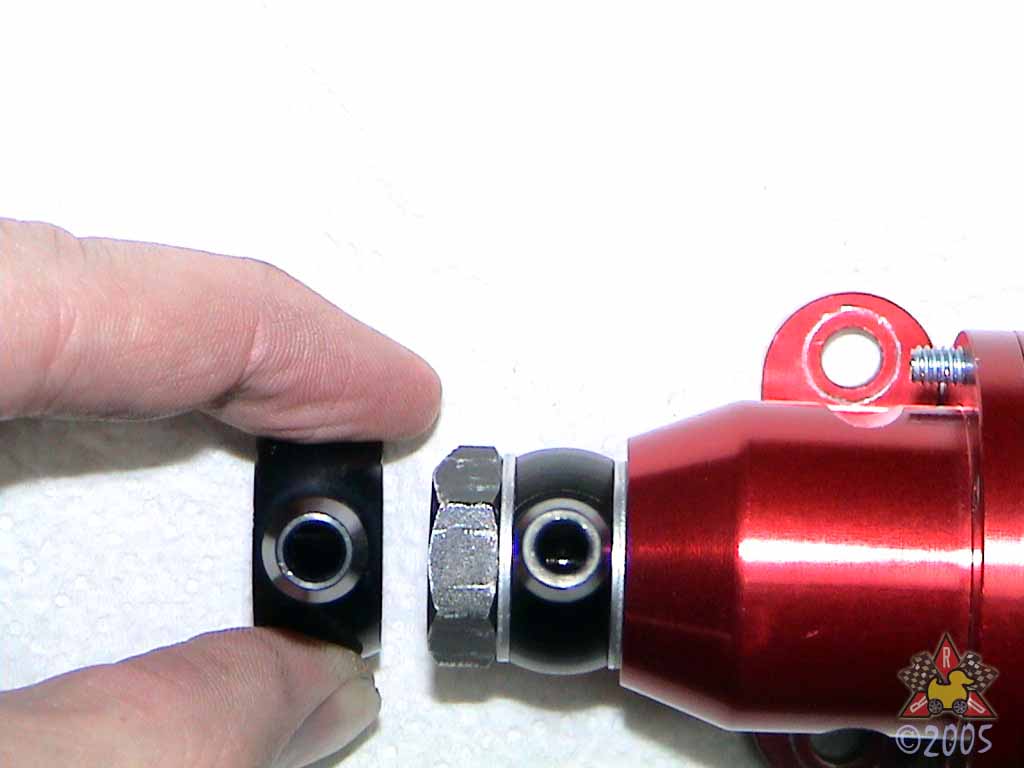
- Mitsubishi-Honda Fuel Rail Adapter Kit
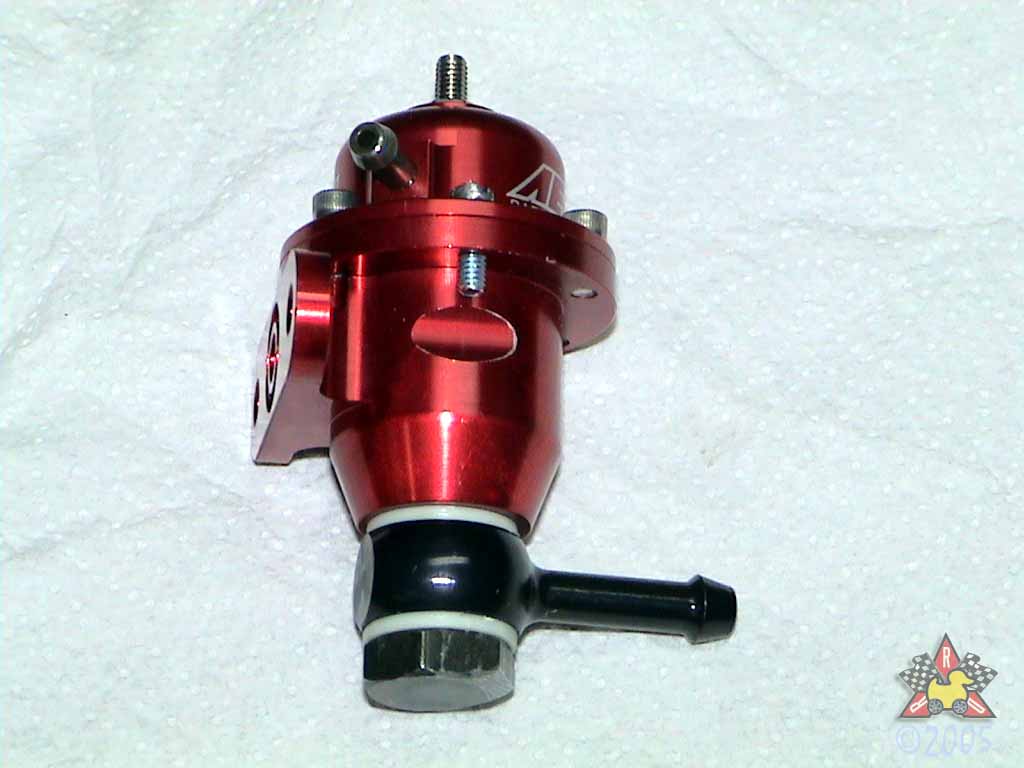
- AEM Adjustable Fuel Pressure Regulator
Where Can I Get the Stuff To Do This?
| Part | Company/Contact | Part Number | |
|---|---|---|---|
|
|
AEM Adjustable Fuel Pressure Regulator | Altered Atmosphere Motorsports | AEM 25-303 |
|
|
3000GT/Stealth Fuel Rail Adapter |
Rob Beck (e-mail)
or Rob's 3Si Thread with Details |
N/A |
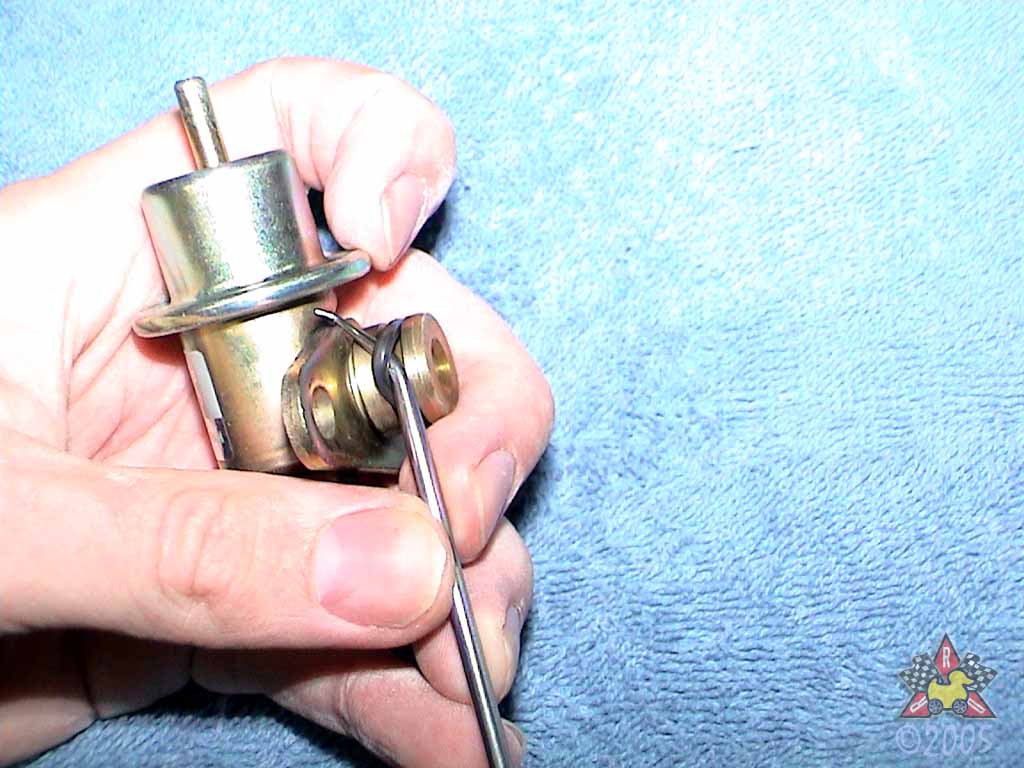
What Tools May/Will I Need?
- 5mm Allen Wrench
- 9/64" Allen Wrench
- 9/32" Allen Wrench
- 5/16" Wrench
- 1/4" Drive Socket Wrench
- 10mm 1/4" Drive Deep Socket
- 3/8" Drive Torque Wrench
- 19mm 3/8" Drive Socket
- Small Curved or Straight Pick
- Masking Tape
- Latex Gloves
- Paper Towels or Shop Towels
- Clean Engine Oil
- Pliers
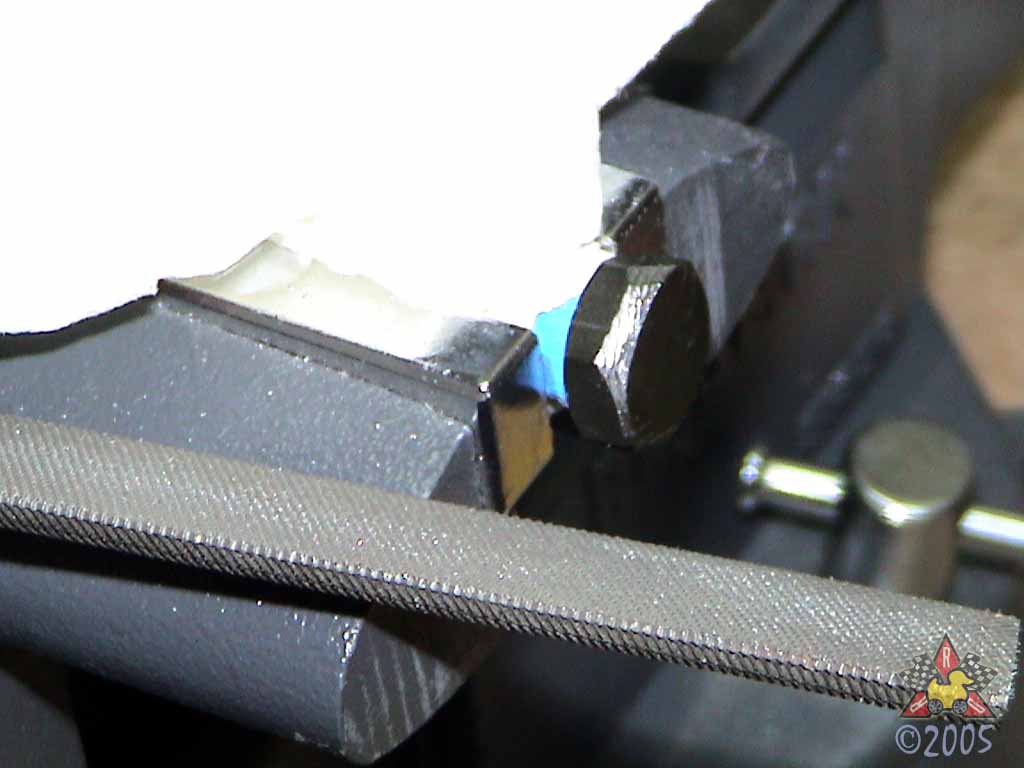
- File, Dremel, or Small Grinding Tool
- #2 Phillips Screwdriver
- Bench Vise or something similar
- Fire Extinguisher (better safe than sorry)
Erik's Review
- Woohoo! This thing rocks. The adapter plate fits like a charm and is easy to install. The regulator works beautifully and keeps my fuel pressure constant under almost all conditions. I occasionally see it rise by 1psi under high vacuum (engine braking) or drop by 1-2psi at high RPM. The rise under engine braking is a) very small and b) only when the injectors are off, so I don't think that's significant. The drop at high RPM is somehting I haven't been able to explain yet. I don't think it's that the fuel pump is not able to flow enough fuel because I see the same drop in fuel pressure whether the target fuel pressure is 43psi or 48psi. If you've got an explanation, please let me know. It doesn't seem to cause problems at this point, so I'm leaving it alone.
- After resetting the ECU putting a few hundred miles on the car, my throttle-transition knock and my low-RPM/part-throttle/high-load knock are drastically reduced. I still see a little knock every once in a while under low-RPM/part-throttle/high-load conditions, but it's generally in the 1-2 range and it's very infrequent. I still occasionally see some throttle transition knock, but again, it's significantly less frequent, and it generally doesn't occur unless I'm running higher-than-stock boost. This is a huge change from the previous setup (hotwired Supra pump with OEM regulator) where I could get knock counts of 3-7 virtually on demand under low-RPM/part-throttle/high-load or when punching the throttle in 5th or 6th on the freeway.
- Additionally, I've found that with the fuel pressure set between 43 and 48psi, the smallest (black, pre-installed) discharge port for the AEM FPR works just fine.
- As I have more time, I'll probably play around with my fuel pressure a little more. As long as the pump can keep up, I'll probably bump it up 5-10psi to get some extra flow out of the stock injectors. I've run it at 48psi for a couple days now, and it seems to work fine. My fuel trims have come down from their previous settings, and the car seems to run great.