Why Do I Want To Do This?
-
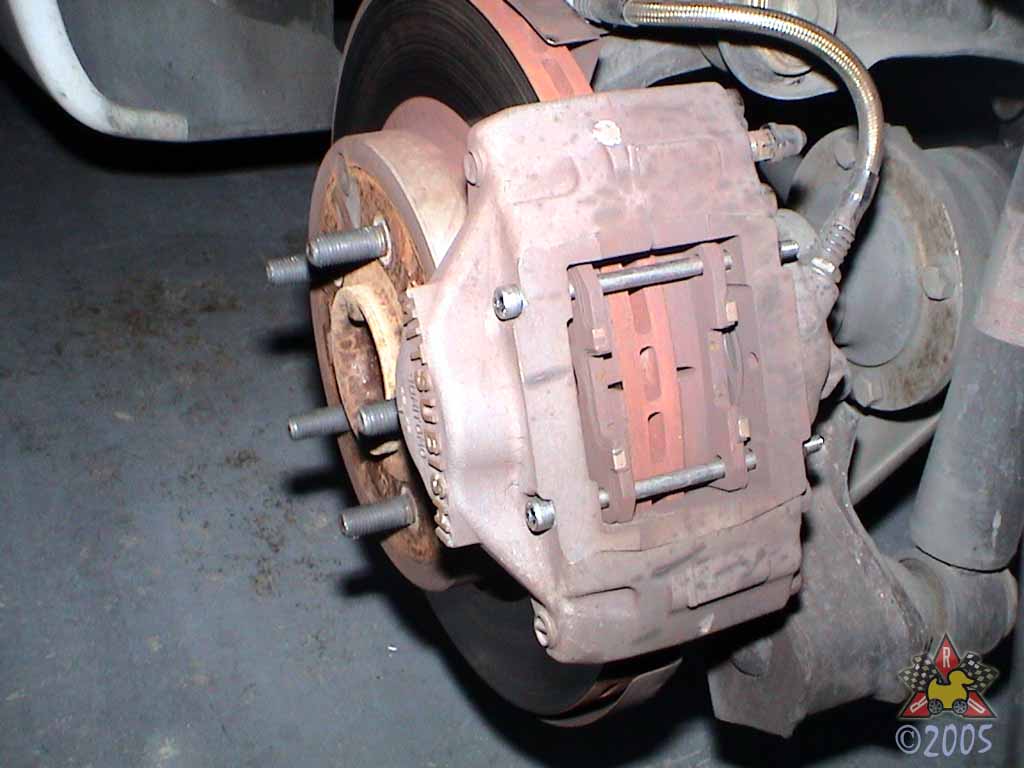
The braking system installed by Mitsubishi at the factory is (IMHO) quite
good under most conditions. However, under repeated braking, especially
from high speeds, the stock braking system starts to show its limitations.
During repeated high-speed track use, I've experienced pad fade, boiled fluid,
rotor grooving, and excessive pad wear, even when using brake pads
designed for track use. As best as I can tell, these problems
are caused by excessive temperatures in the [front] braking system.
These excessive temperatures indicate that the braking system is not able to dissipate the heat generated by repeatedly slowing the car under track use. To put this in other terms, the heat generated by decelerating the car is greater than the heat that leaves the system into the air. To address this problem, one can increase the thermal mass of the braking system or increase the system's ability to dissipate heat. The first option is only a band-aid as it will only delay the onset of excessive brake temperatures. The second option is a more thorough solution, as it increases the speed at which heat leaves the system.
Larger brake rotors generally increase the thermal mass of the braking system. They can also increase the surface area available to dissipate heat. Unlike the OEM rotors, SCE rotors are directionally-vaned, which will also increase airflow through the rotor, which helps take heat out of the system. Hopefully, these rotors will address the excessive brake temperatures while allowing me to continue using the OEM calipers, and OEM-sized pads.
-
Since installing these rotors necessitates swapping out the pins that hold
the pads with bolts, it should increase caliper stiffness.
-
The SCE rotors are a two-piece design, which means that the hat (the central
black part) is a separate piece from the disc (the outer silver part). This means
that when the discs eventually wear down to their minimum thickness, I can
simply purchase replacement discs rather than having to buying whole new
rotors.
-
From Philip at SCE:
SCE rotors have a wider air gap and larger directional vanes for better heat dissipation. Air normally flows through the wheels in the direction from under the car and to the outside. The vanes' air inlet on these rotors is on the back(in-board) side of the rotors, which is the proper location for that inlet.
I do not recommend using C-clamps on brake calipers. It if takes more than a hand effort to press them in they should come out for gunk/rust cleaning and seal replacement.
How Long Will It Take Me To Do This?
- Once you have the front end of the car in the air and the wheels off, plan on an hour per side if you're taking your time by cleaning everything off prior to disassembly and double-checking for leaks after reassembly.
Anything I Should Do Prior To Attempting This Procedure?
- Raise and properly support the front end of the car.
- Remove the front wheels
- Thoroughly clean the calipers and the area around them with a good degreaser or brake cleaner.
What Mitsubishi Parts Will I Need?
- [optional] Front brake caliper dust boots
What Other Parts Will I Need?
- SCE W-I-D-E Brake Rotor Kit
- ATE Super Blue Brake Fluid (or other DOT3+ fluid)
Where Can I Get the Stuff To Do This?
| Part | Company/Contact | Part Number | |
|---|---|---|---|
|
|
SCE W-I-D-E Brake Rotor Kit | Supercar Engineering | SCE-WIDERotors-2gTF2 |
|
|
ATE Super Blue Brake Fluid | Autotechnic | B-ATE-blue |
What Tools May/Will I Need?
- 17mm 3/8" or 1/2" Drive 6-point Deep Socket
- 14mm 3/8" or 1/2" Drive 6-point Deep Socket
- 3/8" or 1/2" Drive Ratchet
- 18" Cheater Bar [optional]
- 10mm Wrench
- 5mm Allen (Hex) Wrench
- 3/8" Wrench
- 4" or Larger C-Clamp
- Rubber Mallet [optional]
- Shop Towels
- String or Bungee Cords
Erik's Review
- Two very enthusiastic thumbs up for this brake setup! At my first track day after installing these rotors (06/15/05), I was finally able to "just use" the brakes and not be paranoid about overheating them. I was able to use the brakes fully whenever I wanted to and there was never even a hint of pad fade or fluid overheating. I routinely entered the braking zone for Turn2 at Pacific Raceways between 100mph and 120mph and decelerated to around 60mph to negotiate the turn. Then, I would slow from around 90mph to around 35mph - 40mph for Turn 3A. I'd even trail-brake into 3A, and the brakes never seemed to complain. For all of the braking zones (2, 3A, 3B, 4, 8), the brakes had consistent, predictable, and agressive bite and were a pleasure to drive. I used brand-new Porterfield R4 pads for this event (bedded, of course), and I saw no excessive wear and observed no nasty smells during operation. In fact, after the pulling into the pits after the completion of a session, my rear brakes were significantly hotter than my front brakes! My front brake rotor temperatures (after a cool-down lap) were 200F-250F cooler than my when I had the OEM rotors, so there's a pretty significant increase in cooling ability with these rotors...
-
So finally, I have a brake setup that seems to allow me to repeatedly slow
the car under high-speed driving conditions:
- Supercar Engineering W-I-D-E (35mm) Front Rotor Kit
- Front Brake Dust Shields Removed
- Porterfield R4 Front Brake Pads
- Supercar Engineering Titanium Front Brake Pad Backing Plates
- OEM Rear Rotors
- Porterfield R4S Rear Brake Pads
- ATE SuperBlue Brake Fluid